I’m actually proud of myself. I made it to almost two years in this house without making any significant changes from my initial move-in. But what began as a simple guest bedroom refresh, turned into major home decor updates at The Queen’s Quarters.
How it all started...
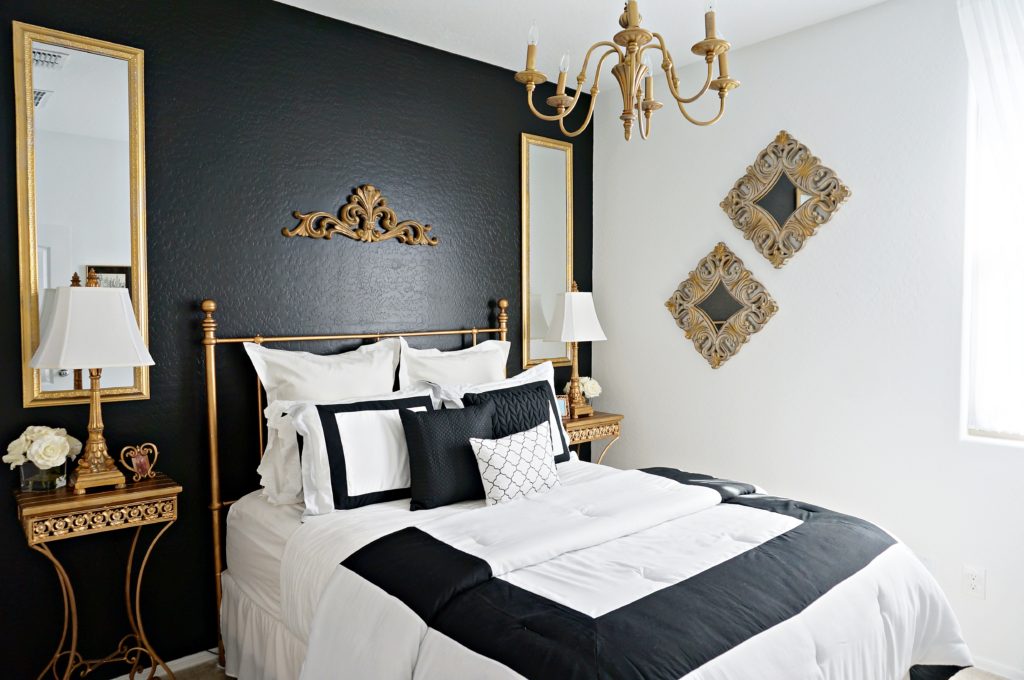
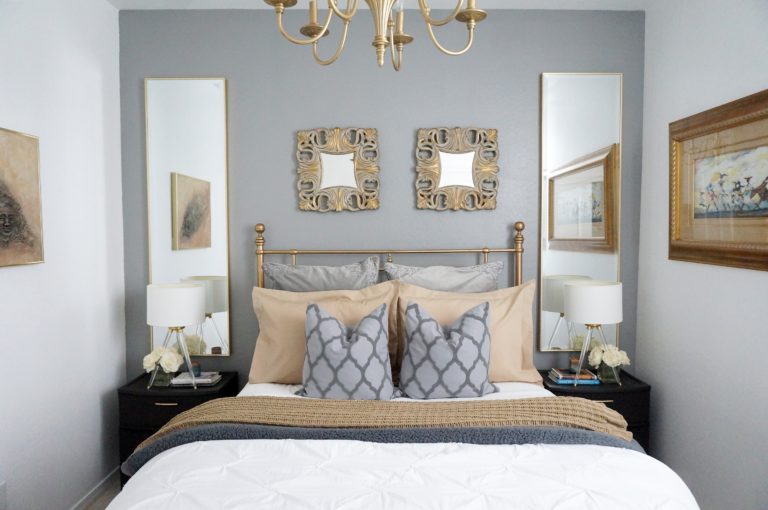
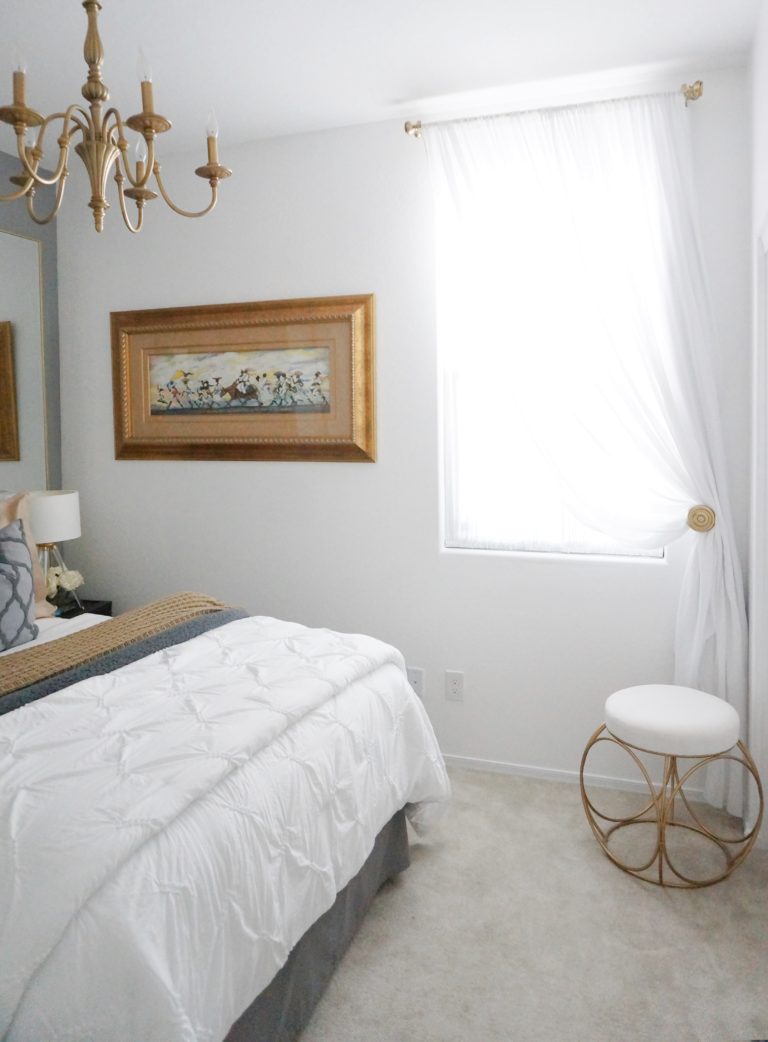
First off let me say, I know it’s been a while since my last post. Actually, I’m two weeks late, according to my post schedule. But I have very valid excuses, like… items not arriving on time, and wrong pieces arriving and needing to be replaced, and deciding to paint not just one or two rooms, but the whole house, and lastly, none of this was part of the plan, haha!!! But here we are. I started with the guest bedroom because every time I walked by it, I really, really didn’t like it, but couldn’t settle on a new vision for it, and I didn’t want to have to spend any money on it. After finally spending an hour or so on Pinterest, I decided on something more natural, less old Hollywood glamour, with grays and tans, and not so girlie. I’m very happy with the end result. Here’s the before…
And after…
I primed the black feature wall with three coats before applying one coat of Behr Marquee “Shark Fin” in Satin. I swapped out the window treatments using my favorite, lightweight gauze-ish fabric which I keep on hand, added two mirrors I found by happenstance while looking for something else at TJMaxx, that were taller and more modern than the others, changed the comforter (from HomeGoods), and pillow shams (from Bed Bath Beyond), finishing it all off with a couple throws from Target and Aldi (yep, Aldi), and two pillows I just had to have, again from HomeGoods. The lamps are from Target. I purchased them four years ago for use as my as part of my “day job” desk/office decor, and the “night stands” are actually storage units from Target with the handles spray painted. When I was sourcing options for night stands, everything with the dimensions I needed was $350 each and up. Remember, it’s a guest room that’s been used twice since I moved in, and low-cost was driving my game plan, so for all intents and purposes, this is just a staged room most of the time. All other items in this room were re-purposed from other areas of my home.
Let's Talk About Paint!
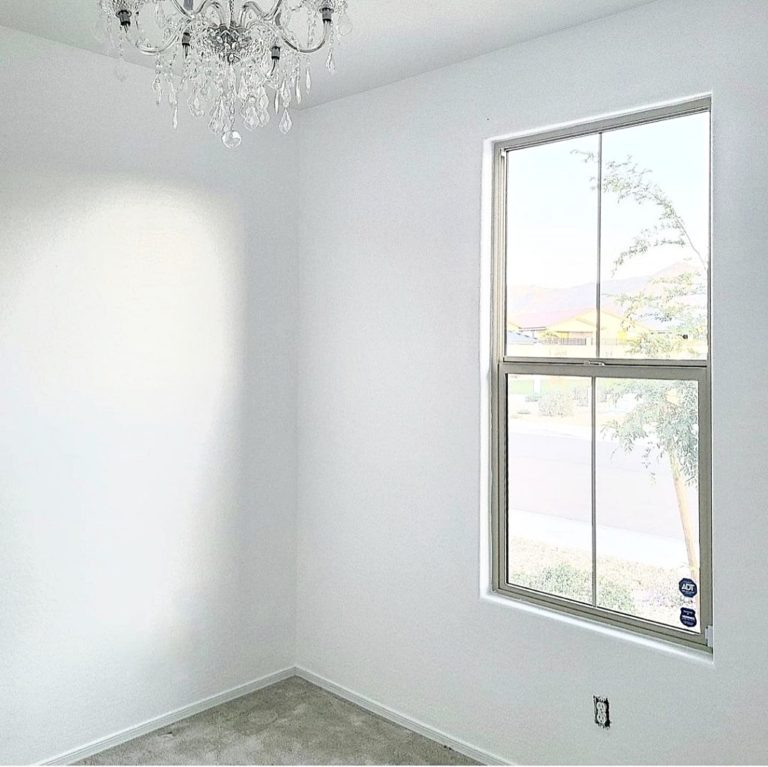
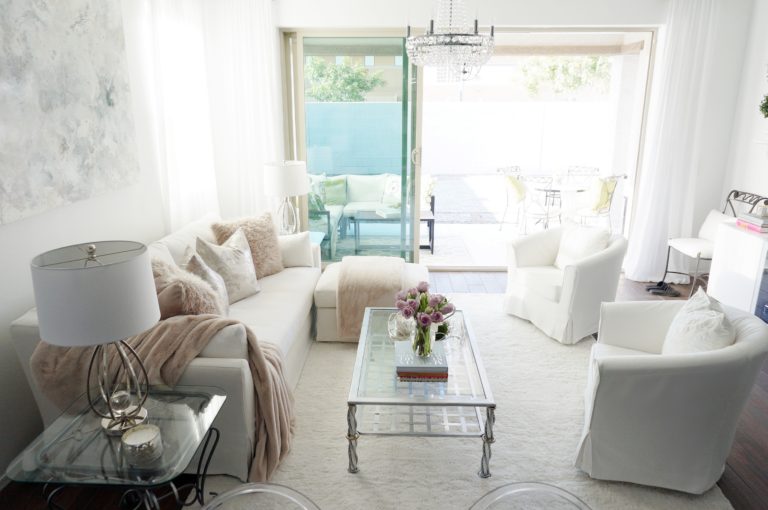
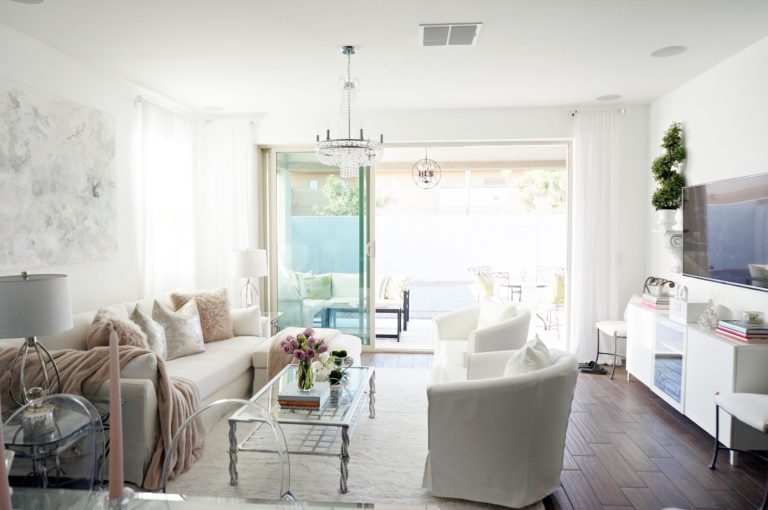
It wasn’t long after I began the transformation of the guest bedroom that I started looking to change other rooms. Literally, while I was waiting for the 3rd coat of primer to dry on the guest bedroom wall, I started moving everything out of the front room, which is a second guest bedroom/sitting room. If you follow me on Instagram, you may remember me talking about the room transformation and the paint difference in my stories.
I know it’s not as prominent in this photo as it was “in person”, but trust me, there was a big difference in the whites; big enough to where after I finished painting this entire room, and one wall in the office, I could see a difference. It drove me crazy that the other walls in the office and the rest of the house looked dingy, dull and sort of grayish next to my newly painted bright white wall(s).
Freshly painted using Behl Marque "Pure White" in Satin finish.
All “whitest white” or “bright white” paints are not the same. Not to disparage the paint company the builder used, but it’s the second home I’ve lived in where Sherwin Williams was the paint of choice, and it just didn’t cut it for me. Having painted those two houses myself from top to bottom, the thought of doing it again, especially after paying the builder, (cough) Gehan Homes, worst builder EVER (clears throat), extra for a “pure white” paint, had me all discombobulated for the next two days. (You can read all about just how horrible this builder was HERE.) Me imagining breaking everything down, removing all the wall plates and window dressings, all the other prepping, and THEN all the painting and clean up, ugghhh!!! But ultimately I knew if I put it off for another time, it would bug me to no end, so… what’s a girl to do, but dive in and just get it done! There were so many trips to Home Depot, sometimes 2-3 a day. It’s scary that every person that works in the paint department there knows me. It took two full days to paint all the other areas: the two other office walls, the master bedroom, hallways, entranceways, and the living and dining rooms. The wet areas, including the laundry room, kitchen, and bathrooms, I repainted when I first moved in.
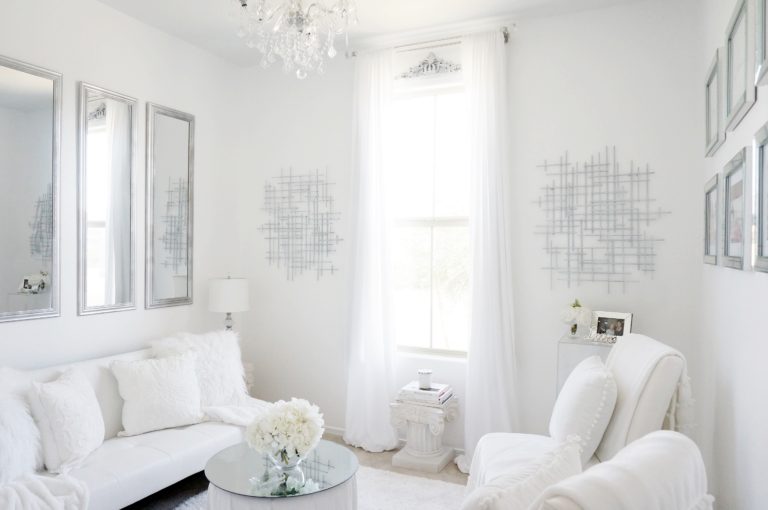
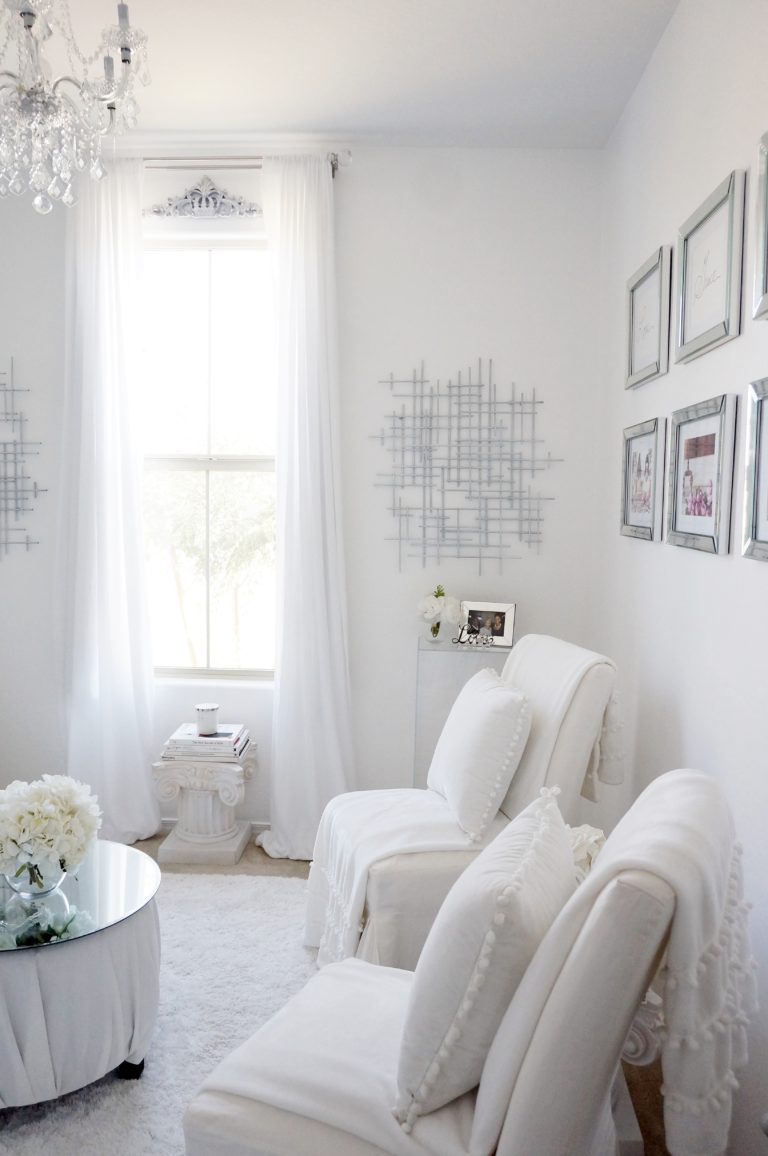
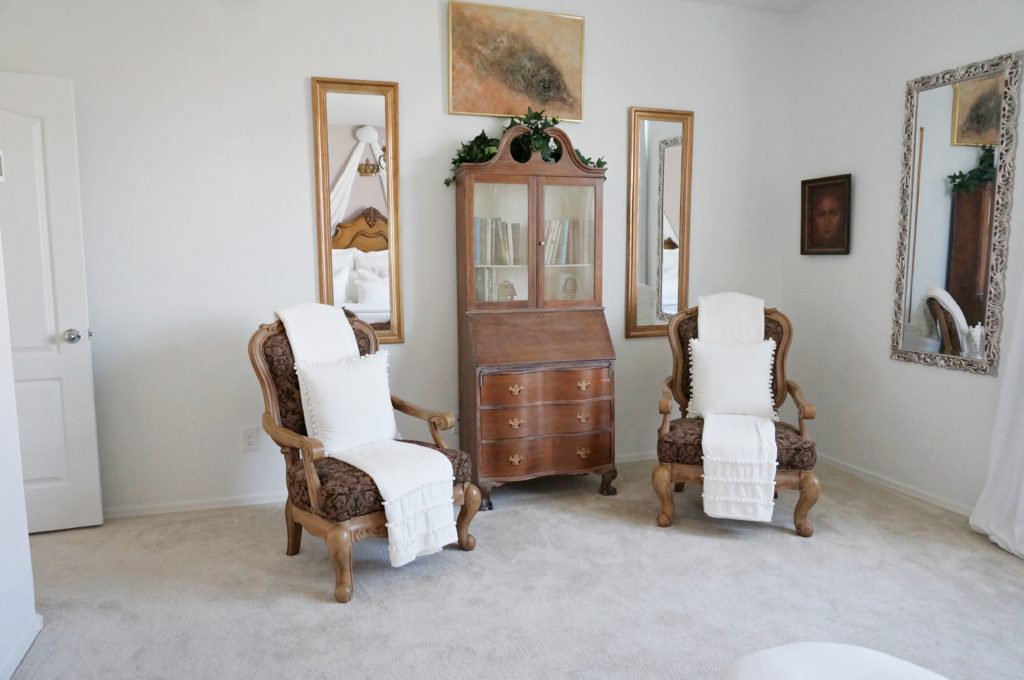
I swear by Behr Marquee paint; no-to-low odor, fast drying, only one coat necessary most times, and the depth of coverage is phenomenal. Now the entire house is done with the Behr Marquee paint, yay!!! So here’s the before and after of the second room I tackled, the guest/sitting room…
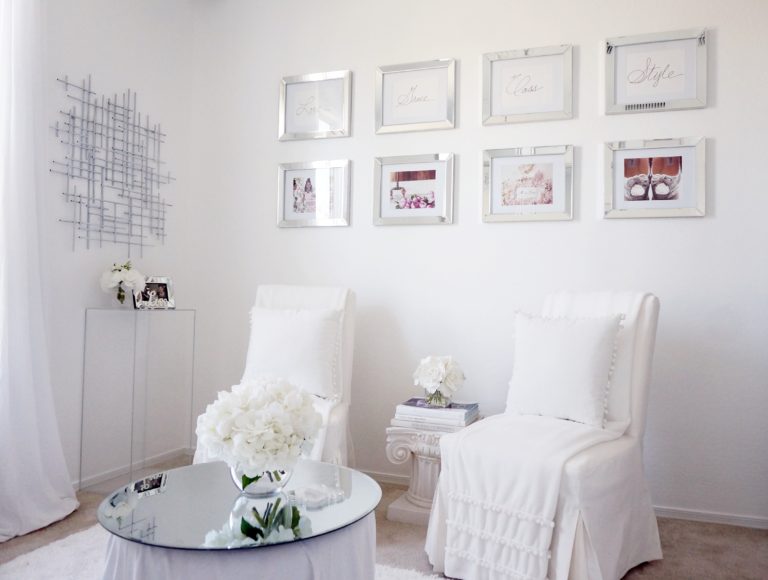
Changes to this room include: adding an area rug and extra wall art, (from HomeGoods), adding two pillows (from Hobby Lobby), and swapping out the picture frames (from JoAnn’s at half price, collected over the last 4 months). The big green chair is on it’s way to having another home… i.e., being sold. The glass desk/table is now housed in the nook off the entranceway from the garage, and the two chairs that were there in the garage entranceway (extra’s from my dining table), have a new home along the wall beneath the framed pictures in this space. I love “shopping” my own home, and I’m so pleased with how it all turned out.
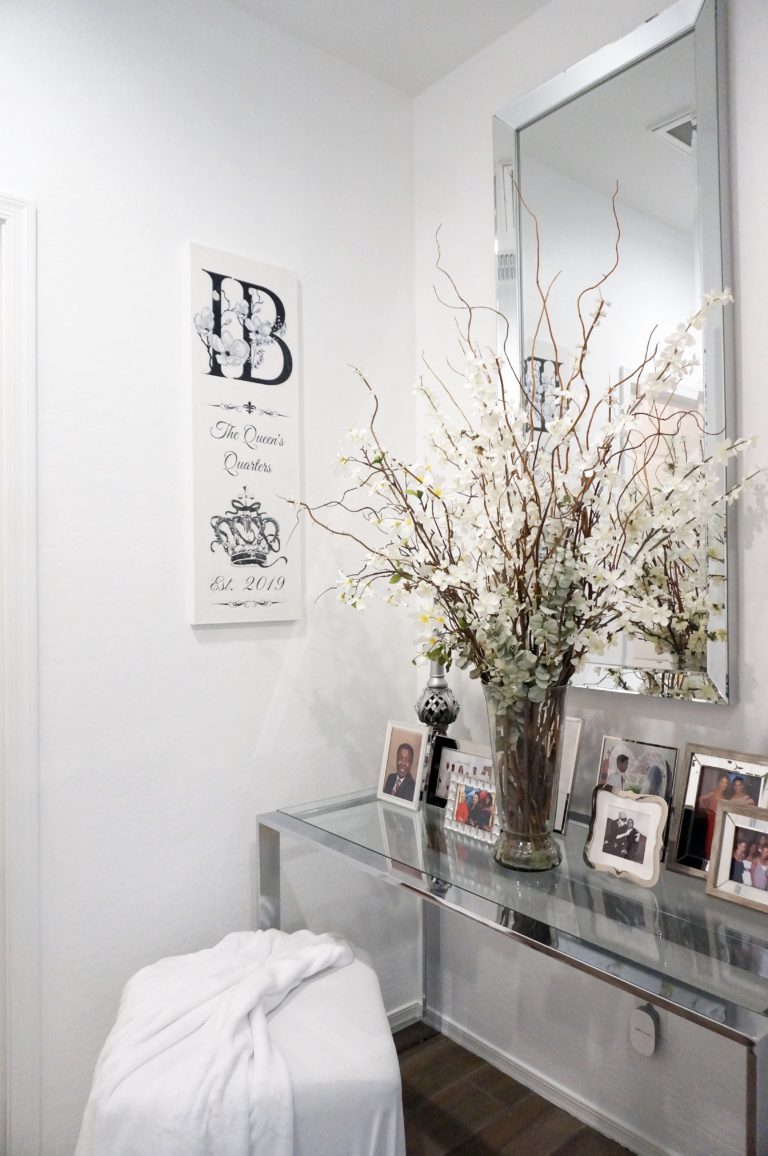
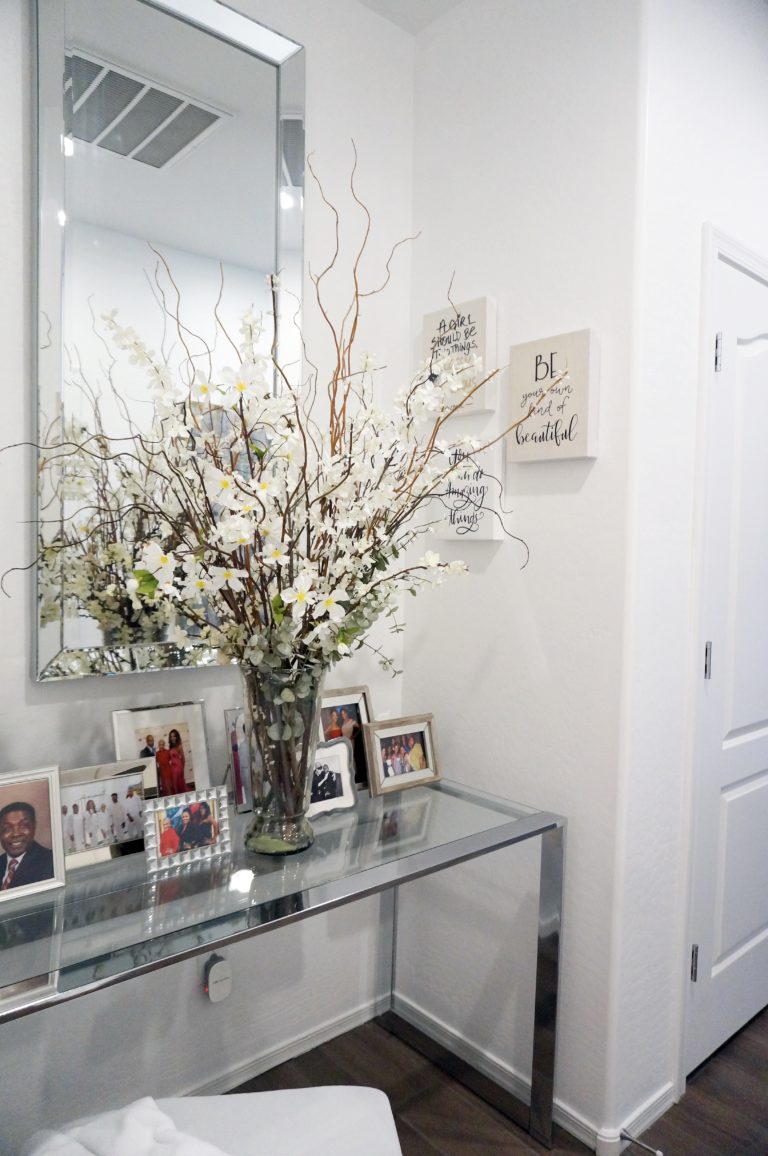
Here’s a peek at the revamped entranceway off the garage…
It’s such an awkward space to photograph so I couldn’t get better captures of it. I re-upholstered the stool that used to sit in the front entranceway and moved it, as well as all the family/friend photos and wall art from the guest/sitting room to this spot. Oh, and I added the extra stems from the arrangement from the sitting room to this one to make it fuller and a bit more dramatic.
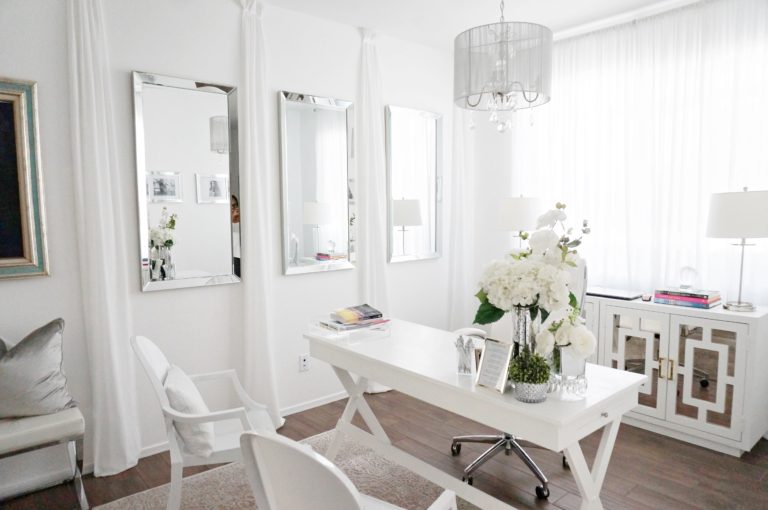
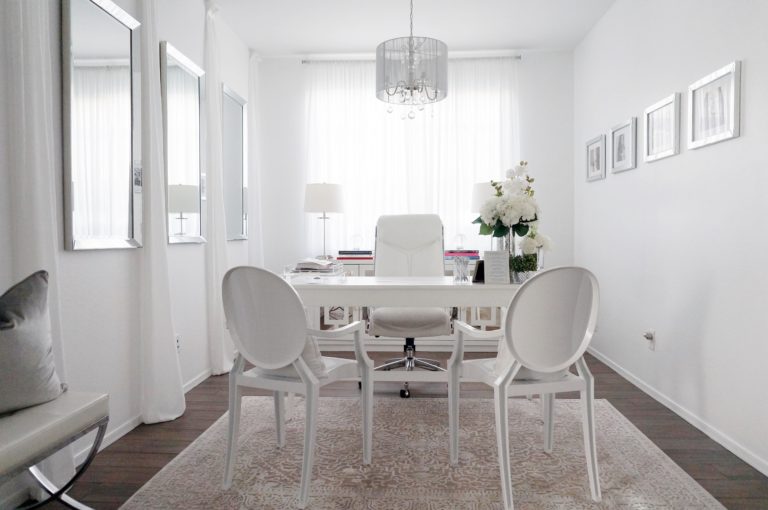
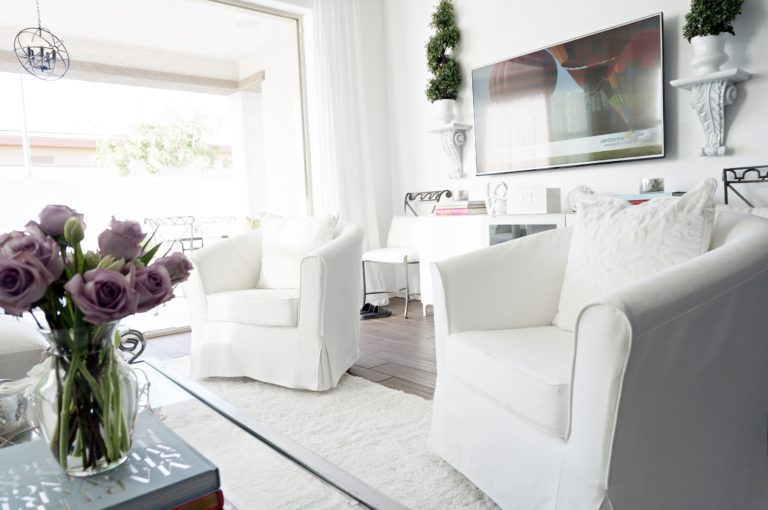
The New, Bright, White Office
No other decor changes here. I just love how much brighter it is. This room never “photographed” bright white. I always had to do some editing. Now I don’t have to.
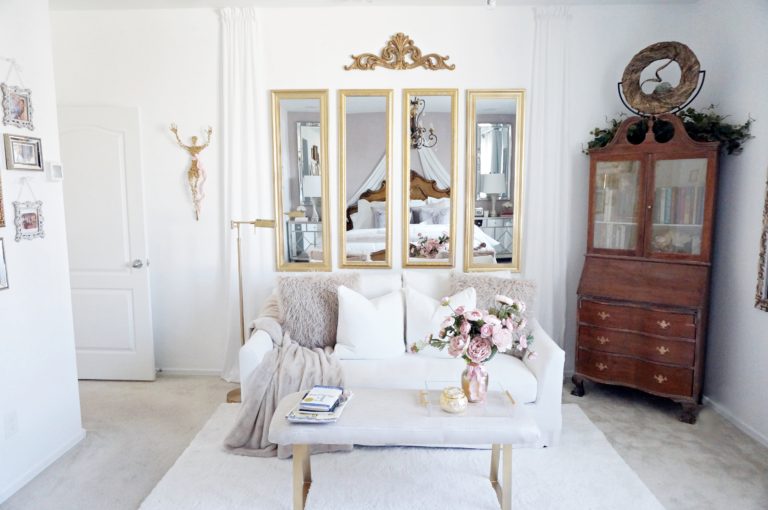
The Master Bedroom and Closet
There were significant changes in the master bedroom. I was never completely happy with the area across from the bed, and always imagined having a sofa there. Well, I wasn’t about to buy a new sofa, so I moved the love seat from the living room into the master bedroom. The living area always felt a little cramped to me anyway, but I’ll get to that in a bit. I moved just a few other things around and so here’s the before…
And after…
I absolutely love how this turned out! Along with moving the love seat in, I added an 8×10′ area rug (from Ross), repurposed two of the mirrors that were previously in the guest bedroom, hung some fabric for framing and adding a little romance and drama (you know I love decorating with fabric and mirrors). I made a little bench using materials I already had except for the “legs” which came from Amazon, that I of course spray painted gold (you know me). The pharmacy lamp was also purchased from Amazon a while ago, but never used until now. And lastly, an art piece was added to the top of the secretary desk/bookcase/dresser, created by my mom, PaBell Studios, called “Ingrid’s Solo”, inspired by one of my singing performances many years ago. It’s on loan, wink wink.
You can check out the original master bedroom reveal post HERE.
In the master closet, I changed all the frames to the pictures that flank the entranceway walls off the master bath…
As I detalied in the Master Closet Re-do post HERE, I was really tired of the black and white theme. Changing the frames (HomeGoods) to these antique gold trimmed mirrored ones was the last part to finishing this space. They’re the same ones used in the master bathroom. You can check out the update inspired by those frames, HERE. It took a while to make the switch because I needed so many of these frames and they didn’t always have them. So over a period of 4 months, I finally had enough with the help of a few slightly different ones from JoAnn’s, the same ones used in the guest/sitting room that were left over. They fit in perfectly. I also added white runners (from Walmart) for now, until I can get new flooring. That’s a ways off though. I wanted something doable in white, that could be easily and inexpensively replaced. I mean… they’re white 🙂
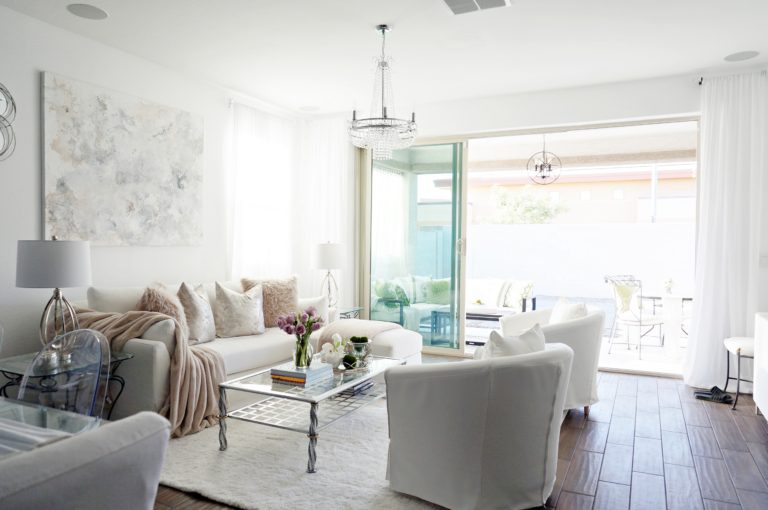
The Final Frontier...
This was the most challenging space because, as you can see in the picture above, I was not trying to move everything completely out of the room. (Shh, don’t tell anyone, but I cheated on some of the prep work.) So maneuvering without getting paint on things was a bit tricky. But I did it! If it’s one thing I’ve gotten quite good at, it’s painting. And it’s a great de-stresser for me. I turn the music up and get to it, taking a few dance breaks in between coats 🙂 So here’s what it all looks like now…
Two Tullsta slipcover chairs from IKEA were added to this space.
The only other thing added here was the area rug. I go through these quicker than I’d like. I’ve had three since I moved in. One had terrible shedding, one turned out to be cheaply made and was matted within a month, and the other one wasn’t as light as I wanted, but I used it any way because I didn’t want to start yet another search for a new one, or spend the money. This one is larger than the usual 5.3′ x7.7′ I get, at 8′ x 10′, the same rug that’s in the master bedroom from Ross.
And Now I'm Done...
We all know that’s not true. A decorator is never finished decorating. But I am tired, so other than moving a lamp or switching out florals, I’m done re-doing and updating the house for a while, at least until I’m ready to implement major changes, like… you guessed it, flooring, haha! Watch this space 🙂 And please, share your thoughts in the comments section. I’d love to hear from you!
8 thoughts on “The Queen’s Quarters Home Decor Update”
Pierre Robinson
Everything looks just great! Although I may have been a bit parcel to the before quest room, the current has a very clever look to it. I think I’m more impressed with the meticulous quality of work and your eye for detail you put in too each and every room. Great job Ingrid!
Aww, thank you so much Pierre! I really wanted a less specific feel to the guest bedroom, and it took me almost a month to settle on what you see pictured. I so appreciate you stopping by, and your support 🙂
Lovely, but I found it difficult to determine the before and after photos with the deciding arrows. My assumption was the before is on the left of the arrow and after the right arrow. To me the advantage would had been to simply the distinctions.
All the before photos and after.
Other than that bravos to your ideas and definatelly for your choices of decor and doing it ecconomically. ” Great Job”
Hi Teddy, you are correct, the “before” pic is on the left, the “after” pic on the right. Thank you so much for your suggestion, for your “kudos” and for your suggestion! I will definitely consider that next time:)


Everything looks just great! Although I may have been a bit parcel to the before quest room, the current has a very clever look to it. I think I’m more impressed with the meticulous quality of work and your eye for detail you put in too each and every room. Great job Ingrid!
Aww, thank you so much Pierre! I really wanted a less specific feel to the guest bedroom, and it took me almost a month to settle on what you see pictured. I so appreciate you stopping by, and your support 🙂
Love reading this post. All of the updates look amazing. I cant wait to see what you do to my guest room. Your decor ideas are awesome.
Thank you Mom! I too can’t wait to see 🙂
Lovely, but I found it difficult to determine the before and after photos with the deciding arrows. My assumption was the before is on the left of the arrow and after the right arrow. To me the advantage would had been to simply the distinctions.
All the before photos and after.
Other than that bravos to your ideas and definatelly for your choices of decor and doing it ecconomically. ” Great Job”
Hi Teddy, you are correct, the “before” pic is on the left, the “after” pic on the right. Thank you so much for your suggestion, for your “kudos” and for your suggestion! I will definitely consider that next time:)
Very Nice. I feel really lazy now. Lol! But really, great job!
Haha!!! Well thank you so much!